Showing posts with label The Newport. Show all posts

Monday, May 21, 2012

A Little Stagnant ~

Stagnant - Having no current or flow and often having an unpleasant smell as consequence...

Well, O.K. then!  The unpleasant smell part may not apply, but I have no current or flow right now, so it works... ;)  I'm stuck on a couple of things and that's why you haven't seen a post (or two) lately...

It looks like you all really liked the bay window improvement, that is great!  I thought you would... ;)  I do!  I did decide though that instead of adding the bay window to the study, I'm going to put in the door... 

I really thought about it and I may add the bay window to the second floor of the addition instead.  I am going to eliminate the deck off this door, but I am going to make a little staircase, and put in some gardening, etc.  I liked the thought of having the door here much more than I did the window. 
 
I will add the double window to the bay area of the front of the house, both on the first and second floor... I really like the idea of this window here, and on the second floor...the single window here does nothing for me.
 
 
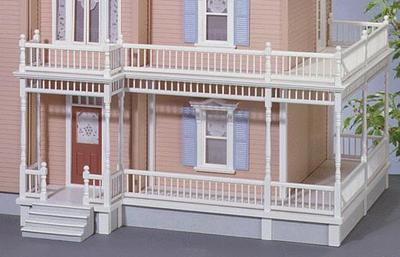
It also looks like you voted to extend the porch, another great! 
I like the idea of the porch rockers rather than the wicker set, so this will stay, with a little table to complete the look.  So the next thing for me to do is get the porch floor and foundation in place permanently so I can finish the foundation. 

As soon as my DH cuts the door openings for me on the addition kit I will be putting up the walls and gluing them in place...very excited!!! :) 

So I know what I have to do, it's just doing it, (well, finding the time to do it!). 

Tuesday, May 15, 2012

Improved Bay Window? ~

I was playing around the middle of last week and found some spare parts...I had three bay window kits from the RGT Bostonian I had (once upon a time) planned to renovate...

I put one together and I think I like the way it looks.  It's the same style window as the Newport windows, so it almost looks like it should be standard with the kit!

Bay window next to the standard Newport window
(the Newport window has a sill that is not shown)

The next thing I did was check to see how it would look if I put it on the study wall...
Here's the same wall with the door...
I am undecided on which I like better.  I am leaning towards not adding the deck idea because that would make the house really WIDE!  I can still use the door, but I would probably just put a staircase going down to the oustide and still leave the deck off...

I like the bay soo much that I thought about trying it in another spot. 
I surprisingly have just enough parts to make a third bay window
and I could add to the second floor in the same spot.

Here it is inside the house...
What do you think?

Monday, May 14, 2012

Front Porch (part I) ~

A big pet peeve of mine is the porches that are given to dollhouse kits.  I mean, they sell gorgeous outdoor furniture, why can't we have a nice full porch to display it on?  Instead they give us this tiny little ledge and then everything looks squished! 

The Woodstock came with this type of porch/front stoop set up...

I had huge plans of bashing up this porch to no end!  The upper porch would have been cut to the end corner, and the material would have been used to extend the first floor porch wider...It's sad really, the more I play with the Newport, the more I miss my original ideas of the Woodstock!

Moving on...

I am playing around with extending the front porch on the Newport.  I think I will let my blog followers help me decide on what I should do...
First option...
This is my Raine Take A Seat set...
You can see the extended porch foundation in place in this picture.  I like the smaller porch, however it eliminates the use of railings, which I could take or leave really!  I don't intend for this to be the place for this chair and ottoman...but it shows I have options...
Option Two... 
Extended porch w/two rockers
You can see here my porch extension piece, (cut from leftovers from another project).  This gives the opportunity to add the two chairs and have some space, (if I go with this I will add a little table too).  This also lets me add railings around.
Just another view of Option One... 
Same rockers without the extension...makes it tight, but still workable, again I wouldn't have railings...maybe just the side of the door? 

What do you think it should look like?

Friday, May 11, 2012

Foundation Time! ~

I am done playing for now...I guess.  It is great fun for me to bring out all my furniture and see how it will look, it starts to make it the experience seem real.  I am so close to having the first floor up and ready to go that it won't be long now!

In order to get the first floor walls up I need to finish the foundation. 

I started work on the addition foundation first.  Remembering that the addition will be built separately from the rest of the house, the foundation needs to be consistent all the way around.  I played around with the idea of some sort of bricking, but then came up with stucco.  You can either buy stucco grit mix, use sand, purchase pre-made dollhouse stucco or plain old spackle will do also. 

I had on hand some Mortar Mix and the more I thought about it, the more I wanted to use it as is.  I had primed and sanded the pieces before assembly so all I did was to put up a coat of dark tan all around, making it consistent and not wanting any white to peek through.  I then painted on the mortar mix with a stiff bristle brush.

I did only two sides of the addition foundation and then let it dry to see how it looks...I'm quite happy with the outcome. 
I think it looks just like concrete, (a typical foundation where I live)...and won't distract too much from the rest of the house.  I coated everything once with a coat of Polycrylic, (a water-based polyurethane), so it wouldn't turn yellowish over time.  I'm going to add a second coat so it will get a nice strong seal to it...and once that's finished I can put the final coat of paint onto the nosing and attach...then up go the walls!!! :)

Thursday, May 10, 2012

The Newport Kitchen (part I) (do-over post) ~

Well, really, did you think I would give you a new living room post and not a new kitchen post?

The whole reason behind the dry-fit in the first place was to decide on the kitchen.  I told you previously that I had a design in mind for the kitchen.  I put the house together (with tape) and put the furniture in I had as place-holders, executing my idea...

Here is what it looks like...
The door to the right rear is going outside...the door to the left rear is going to be filled in to create more wall space.  I imagine that the sink will go here if I stay with this layout.  The rounded island, (next to the stove) will have a blind corner cabinet that would look flush once finished.

Bit of a background and off pace here...

I had purchased this kitchen set, with the other two matching pieces, (shown above)...I detested the countertops, so I sprayed them with textured spray paint to change the countertop color.  The sink is not pictured because, (if I use this set) I need to order another one... Long story short, I tried pulling the sink out, it didn't work out well!


So just for comparison I put up the Bespaq set...


I am in LOVE

What do you think? 

Wednesday, May 9, 2012

The Newport Living Room (part I) (do-over post) ~

No, you are not seeing double, I made you another living room post...I did a dry-fit after I published that post, and thought you might want to see some real photos and my direction...

Here is the whole living room, with the kitchen divider in place. 

I wanted to break the room down by sections so you can get a visual for the direction I want to go. 

First is the front door and staircase...
I am playing with some ideas on what to do here.  I need a doorway into the addition kit, and while I like the reversed staircase, (facing the front door), I'm not settled on that being it's final position.  If it is, it will probably have a small closet or a built-in with a bookcase design that I have been playing with.  The staircase itself is the Houseworks slim staircase.  It was a place-holder at first, (I am up-grading the MDF staircases that are standard with the kit) but surprisingly it's now really growing on me and working with the fit of the room.

Next is the kitchen wall...  

The divider in place works here for my kitchen layout, however the doorway on the back of the house will be filled in and flush.  The furniture seen here is not just place-holders, they will all remain, and pretty much exactly where they are. 
Next is the half bath...
The idea for the half bath is not my original, Brae/Otterine came up with the idea for using this corner space as a half bath.  It makes a lot of sense because, typically you wouldn't have the main bath on the second floor of the house be the only bathroom in the whole house. 

A bathroom should be constructed either here or under the staircase.  Here is best, it takes up this really non-use-able space.  The furniture is definitely place-holders!  I have something much more modern planned for this space, a realistic toilet and something along the lines of this for the sink...

I'm still up in the air about a lot of decisions, nothing is final...but it will give you a peek into my thought process...

Tuesday, May 8, 2012

The Newport Office (part I) ~

I'm going to first admit, that I had a WHOLE blog post, with pictures for this room...then I did a dry-fit!

I had been playing with an idea in mind to bash on a window to the side of the house, (the addition side wall), and this was the window I wanted to use. 

I really thought in my mind that this would look great...so I decided to see what it would really look like, I had one of these windows in my "stash" so I put it on the side of the house...

I HATE IT!  It couldn't be worse for this space...

I hemmed on this for a few hours today...debating in between love and hate, (literally going back and forth because part of me does like it).  Well, in between this dry-fit and re-writing this blog post, I read a blog post by another miniaturist, Emily.  I got soo inspired by the deck that she made for her house that I decided to try to do something like this of my own...(didn't hers come out great?)  So I thought that rather than a window, what about a door, that leads to a (detachable) deck? 

Here is what it will look like, (from the inside). 

The door to the right goes into the living room.  The bricking will not be part of the decor of the room.  I would like to keep this room very light and airy.  The idea behind this room is an office.  The "mom" is a designer, and this is her office, so it will be very white and bright...I like the red floral for the room, with a white bookcase and white desk?  Maybe some cream color on the walls? 

I could also go with a yellow and blue color scheme using this piece... 


What do you think?

Monday, May 7, 2012

The Newport Living Room (part I) ~

A big HELLO to my newest follower, Ginger... :)

I showed you some photos the other day on some design inspiration I had been having for the Newport kitchen, I found a nice groove with that and thought I would share some more and move over into the living room. 

The furniture that I have planned for this room is by Lee's Line.  I find that Lee's Line creates the most realistic miniature style furniture for my taste, and you will find that my house will be full of it!  I luck out with finding pieces on Ebay for very reasonable prices,

The print that I have is called Bren Tweed...it's not really perfectly to my taste in this color/fabric...but I'm going to work with it because I got the entire set at an incredible deal...


Some of my mini friends might remember this photo from the Woodstock... 

In preparing for the Woodstock I had found some really interesting textured scrapbook paper at Michaels that I picked up, I'm thinking that I could use this first color in the kitchen, and then coordinate it back into the living room, or use the second color as they seem complimentary to me... what do you think?


This set also coordinates very well to blue, (as there is some blue in the fabric of the sofa)...here is a room box done, by Happily Ever After.  It was featured on their Facebook page, and when I saw it, design inspiration hit me!!!  This slate blue could coordinate back to the kitchen color featured above, what do you think?  


If I chose to use this blue on the wall, I might include the black chair rail, but I'm unsure if I would use the white below, although it does add a nice touch of elegance to the room.  I would probably also paint the furniture legs to black so it would better coordinate back to everything...what do you think?

Friday, May 4, 2012

The Newport Kitchen (part I) ~

I suppose for now that I've played enough with my older photos and it's time to get back to work. 

I am in the need of waiting for supplies before I can do anything more to the house, so until then, I have been poking around online for inspiration photos, pieces, etc.  I had imagined that I would be using the majority of the furniture that I already own, (and some special pieces I had chosen just for the Woodstock).  However, the farther along I get with this house, the more it doesn't seem that will be. 

The elements of design I had for the Woodstock and the idea of it, was that of a very elegant style.  It had a large kitchen and a separate dining area and a home office.  The more I dry-fit, review and think about this house, it seems that it wants to take it's own direction with the decor scheme.  To me, the Newport wants less of the fuss, it's got an eat-in kitchen and is requesting a family room. 

If you remember from a previous post, I had picked this dining room set with the Woodstock in mind.  I thought the natural transition would be to put it into the Newport. 


Well, it seems the Newport has decided against this, because I found this photo, (of a RL dining set) and I can almost hear the cries coming from the craft room! 

I really LOVE the black against the wood grain, and the color on the wall with the white trims...to me, this is a very nice room, elegant, but relaxed, and I am going to base the rest of the interior decor designs around this photo.  I think that I could replicate this room very easily, but because the Newport is a combination kitchen and dining room, the kitchen might call for black cabinets to match.  However, I have a few layout ideas in mind, and I'm tossing around the idea of making the large living room into a combination living/dining room, rather than combination kitchen/dining room. 
The cabinet set I had intended for the Woodstock was my Bespaq set, and for the bargain basement price I paid for it, changing it to alter where the design of the Newport will go is not completely out of the question. 


I do have this cabinet set (with a few more matching pieces), and painting these cabinets to fit in with the above room wouldn't be horrible, but not ideal either...what do you think?
Lastly I could always do the Houseworks cabinets...but I'm leaning towards a no on this one!!! :P


Tuesday, April 24, 2012

A Solid Foundation...(is a good place to start!)

It was quite rainy and miserable part of last weekend so I coaxed my dh into helping me work on the Newport foundation.  Don't tell him I told you, but I think he quite enjoyed himself!

They say work from the bottom up, so that's where I started.  The addition foundation was first. 

I had done a number of dry-fits of the all of the foundation pieces already, so I knew what I was dealing with.  I ran into a small problem during assembly and ended up taking about 1/4 of an inch off of two of the pieces that make up the addition foundation. 

*I would not recommend this if you are new to dollhouses, or if you have other options.  The reason behind doing this for myself was completely asthetic.  In the end, I'm happy with the result.

Once the walls were up, we added the floor...
Finished!
 Adding some glue to the seams...
We next assembled the main house foundation, (remember, both are being built separately).  The front and back wall foundation pieces were really bowed/warped before we installed the floor to the finished foundation, the bow had to be corrected. 

If you look at the two middle pieces, you can see where they gap to the front and back pieces
(the bay is not attached at this point)
Extra glue, tape and a couple nails will help correct the bowing...
Once that was done it was time to put the first floor on.  The floors of the kit are all wood, (nice wood too!), in fact the only MDF on this is behind the bricking and some of the roof sections.  The instructions do not say to use nails to attach the first floor to the foundation, however, with the warp being as bad as it was we made the decision to add nails to help stabilize and correct the warp.  I had to make sure that my dh positioned the nails where they will be hidden and not to interrupt decorating later. 

With the floors attached and both foundations finished, I next dry-fitted the nosing.  Upon doing so, I realized that I need to pre-finish the foundation first, so my next step is on hold for a bit. 

Thursday, April 19, 2012

Dry-Fit #1!

I have been patiently waiting(alright, maybe not patiently) for my 2-story addition kit to arrive so I could finally do my first dry-fit of the house...and it did!!!


I was finally able to start the dry-fit process.  Dry-fit is where the house is built without glue or nails or anything permanent at this point.  It is important to dry-fit so you get a feel for how the build of the structure goes together, what you do wrong at this point can still be corrected.  Doing a dry-fit is great to get some perspective on the house.  For me, I'm still playing around with where the addition kit will go, where the garage will go, and if I want to flip the house entirely!!! :)

Here is the first floor with the addition on the right side, as opposed to the left shown above...
Here is the second floor...this is as far as I've gotten so far.  The addition kit is moved away from the house at this point, and the side walls to the right are missing, as they are comprising my garage. 
I'm very happy with the proportion of the garage to the house.  I think it came out perfectly.  I can't wait to see this a bit further along!!! :)

You will also note that there is no foundation yet.  I am undecided on how I want to finish the foundation at this point, and whether or not the garage will even have a foundation.  I intend to build the house, the garage and the addition kit as separate pieces, not all one unit, so they can be moved around with ease later. 

I still have much more to do, the house is still kinda talking to me, telling me what I should do, what I should change, keep, etc.  In the meantime, I have been keeping myself busy with priming and sanding...there is very minimal sanding and painting for me to do (as compared to a house where the exterior is not pre-finished), so I'm trying to get as much of it done as possible.

This build is very interesting once you get down to it.  It's a system of wall sections and connectors.  These connectors must go in the correct direction or it will throw the entire house build off.  If you are working on this house also, please reference the directions as much as you need to in order to ensure the proper direction of the connectors at all times. 
Here are some of the connectors...
Looks like that's all for now...stay tuned for more... :)

Friday, April 13, 2012

The Conservatory... (Part I)

I had opened up the box of parts for the Foxhall Conservatory and was a little disappointed when I really looked at them.  Unfortunately my big plan of making a conservatory on the side of the house off the kitchen, (to make into a dining room), is just not going to work. 

The walls of the conservatory are on the left and the Newport side wall is on the right...

The difference in the wall heights are way too much for me to figure out how to work with, so back into the box the conservatory went.  I've decided to come up with a new plan.

Last year my DH had me order a garage door kit for my *surprise* Woodstock, thinking I would turn the Mansard addition into a garage/man cave for the house. 


Ultimately I wouldn't have done that because my floor plan called for a different room using that addition kit, so the garage door went into the "To-Be-Sold" pile.  While it didn't work out with the Woodstock, it might work out with the Newport.  

I've done some poking around online at different bricked houses while in the planing stage, trying to get a feel for the contrast colors I want to use and any inspiration I could come upon.  I kept going back to the Home Alone movie house as my inspiration.  I know that there was a garage with this house, but it's not really featured too well. 

So I did some more digging online and found a great inspiration photo for my garage online...I like this all bricked one, thinking that it would be great to try to reproduce.   
While I intend to create a garage, I am not going to exactly replicate this one.  I have no intention of peaking my roof, (it will be flat) and I don't want a 2nd floor on it.  I do like the side door and pathway, the window, the transition in front of the garage door, the all white trim against the brick and the grayed shingles.  These are elements that I fully intend to incorporate into my design. 
So we are back to the drawing board, how to create this?

In the build of the house on the right side, (looking from the front), the walls are shorter than the left side walls.  I quickly found that if I took these two shorter walls, (first and second floor) and put them together, it would give me a side and front wall for a garage!

Shorter side walls used as front and side wall(and me propping my garage door!)
Front of garage

I am happy right now with the proportion of the door to the wall siz, however I need to complete the first floor dry-fit, (which I haven't gotten to just yet) to make sure I'm happy with the proportion size of the "garage" to the house...I also need to plan out a roof and floor...(which will probably be plywood from Home Depot.  I'm hoping that it will size up nicely and compliment the house well. 

What the interior will look like... (my DD likes it!)
However because these walls are rather critical to the actual build :P  I need to reorder them from the manufacturer.  Trying to mimic them or re-create them in any way is not going to work for me, as I'm too particular!!!