I have to admit, at the prospect of "resurrecting" the Woodstock, I am as giddy as a young child at Christmas!!! :)
I have told you previously that I keep a binder, a tip from a miniatures book I read once, and I must say that it's very handy to have. This binder is probably so complete that it would make the most dedicated miniaturist roll their eyes at me. However I hold no shame because I believe you really need to be prepared in some aspects, and I figure that I now have all the bases covered!!! :)
For me, it is important to determine a layout for the house, right now that is stamped down in writing, (literally). Each room is written out onto a separate piece of graph paper, and each graph paper contains the following information:
Which room it is and it's location (there is also a date, in case I change my mind on design)
The Wish List - what I don't have for the room that I want to purchase
The Decor List - wallpaper colors and flooring preferred, etc.
The Component List - defines out an interior door, a single window, a bay window, etc.
The Furniture List - lists out the furniture I own, that will go into this room, (so I don't duplicate or not use)
The Light List - the fixtures I have that I will use, or that I want to order and where and how much they are
A Floor Plan - a rough idea of where I want pieces of furniture to go, really just highlights where windows and doors are...
Yeah, I know, a little too much, but with a house of this size, I find it necessary... it can get very confusing, at least to me, and being a big list person already, this is second nature to me...(you should see my RL house binder!!!)
This also takes away the "impulse" buying, and trust me, I'm famous for it!!! It keeps a hold on everything and helps me keep track of what I don't need to spend money on and what I do.

Wednesday, March 14, 2012

Tuesday, March 13, 2012
One Step Closer... (to my Woodstock!)
I have been working on finagling a way to start possibly buying up the milled plywood walls of my Woodstock kit as we can afford them...(in exchange for moving my craft area back down to the basement my husband finally agreed!!! :)
Ultimately he wants the house to stay down there, and I really don't blame him, as there is no room on our main floor. We have a gorgeously finished basement, and I'm not too bummed about being down there, because as the weather gets nicer, it's much cooler down there, so free air conditioning!!! :P
He agreed recently that I can go ahead and purchase the two walls of the Mansard Addition kit that comes with the Woodstock kit. I need only the side wall and front wall, as the ceiling, floors and second floor walls are made up of plywood already. I went ahead and requested the order from Real Good Toys, and I'm very excited for their anticipated arrival... My opinion on this is even though it's only two rooms, I will be able to build SOMETHING for this house!!! :)
So while I await their arrival I am cleaning out, organizing and pairing down my miniature collection. I have a way of figuring out what I have, where I will use it, what I won't ever use, and what I want eventually to purchase.
I am jumping on a brand new journey...and I hope that you come along with me!!! :)
Ultimately he wants the house to stay down there, and I really don't blame him, as there is no room on our main floor. We have a gorgeously finished basement, and I'm not too bummed about being down there, because as the weather gets nicer, it's much cooler down there, so free air conditioning!!! :P
He agreed recently that I can go ahead and purchase the two walls of the Mansard Addition kit that comes with the Woodstock kit. I need only the side wall and front wall, as the ceiling, floors and second floor walls are made up of plywood already. I went ahead and requested the order from Real Good Toys, and I'm very excited for their anticipated arrival... My opinion on this is even though it's only two rooms, I will be able to build SOMETHING for this house!!! :)
So while I await their arrival I am cleaning out, organizing and pairing down my miniature collection. I have a way of figuring out what I have, where I will use it, what I won't ever use, and what I want eventually to purchase.
I am jumping on a brand new journey...and I hope that you come along with me!!! :)
Saturday, March 3, 2012
FINALLY...the real work begins...
So I was finally able to get the sanding finished!!!
Once the walls were all clean and clear I went to work almost immediately, I was way too psyched with my progress to stop. I primed all the walls with Kilz; after working with various primers I have found that I prefer the Kilz the best, if I have it on hand. Now that everything has been primed, I need to do a light sanding coat from the primer and then start adding the color. I will put only two coats on the walls because I want the color to remain light. Lucky for me any additional sanding on this part is easier.
I next started on the front door...
I had ordered two doors to combine into one. I ordered the 1/2scale palladian door and the 1/2scale traditional 4-panel door to create the look that I want. The first step was to cut the door itself to fit the new frame, which I only take from the bottom. At 1/2scale this is much easier to hide than in full scale where I would have cut equally from the top and bottom to make it fit.
 I then sanded it to make sure it was straight... and it ended up fitting perfectly the first time!!! :)
 Next was to paint. The frame is Wicker White and the door is Country Apple by Folk-Art.
 I need a few more clean up coats on the front of the door to really make the red stand out the way I want it to, but I'm pretty happy with how it looks.
I must admit, 1/2scale lovers block your ears, that I'm getting quite bored with my little farmhouse. I'm really wanting to move onto bigger and better things, i.e. my WOODSTOCK!!!
Once the walls were all clean and clear I went to work almost immediately, I was way too psyched with my progress to stop. I primed all the walls with Kilz; after working with various primers I have found that I prefer the Kilz the best, if I have it on hand. Now that everything has been primed, I need to do a light sanding coat from the primer and then start adding the color. I will put only two coats on the walls because I want the color to remain light. Lucky for me any additional sanding on this part is easier.
I next started on the front door...
I had ordered two doors to combine into one. I ordered the 1/2scale palladian door and the 1/2scale traditional 4-panel door to create the look that I want. The first step was to cut the door itself to fit the new frame, which I only take from the bottom. At 1/2scale this is much easier to hide than in full scale where I would have cut equally from the top and bottom to make it fit.


I must admit, 1/2scale lovers block your ears, that I'm getting quite bored with my little farmhouse. I'm really wanting to move onto bigger and better things, i.e. my WOODSTOCK!!!
Tuesday, February 14, 2012
Real Good Toys Facebook Build-Along
If you are a fan of Facebook, (like me), you may already know about the Real Good Toys Facebook Build-Along. For any non-Facebookers out there, this is the 2nd time that RGT has done this, they provide a basic kit, that's rather affordable, and you build and decorate along with them. You are able to provide pictures and work with and share along your progress. This year's kit is rather unique as it's not a "traditional" kit, but rather a puzzle, meaning you are given a bunch of blocks and you put together whatever your heart desires...
Check out the link below for more detailed information...
http://www.realgoodtoys.com/store/productview/117326//The_Puzzle_Dollhouse_Kit
I must admit, I appreciate this much more than I do the contests. I am that creative, think-out-of-the-box, so being able to see what others are doing, get ideas, help along the way, seems like it would work out the best for me. So I've decided to take the plunge!!!
A sales associate at RGT inspired me with a great idea. She is currently creating a garage to go along with her house...well, that inspired me to create something for the Woodstock...
I don't want to do a garage, (not yet, and not out of this kit), but one of these puzzle kits would be the perfect size for a shed!!! So I think that I've decided to create a shed for the Woodstock out of my kit... Check out my design inspiration...
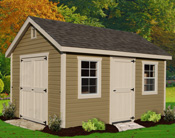
I have a large amount of ideas for this, what I want to do, and how I want it to look, I'm only hoping I can pull it off with only one Build-Along kit!!! :)
*Please note on the Build-Along kit, that doors and windows are not included, it is just a box of blocks... :)*
Check out the link below for more detailed information...
http://www.realgoodtoys.com/store/productview/117326//The_Puzzle_Dollhouse_Kit
I must admit, I appreciate this much more than I do the contests. I am that creative, think-out-of-the-box, so being able to see what others are doing, get ideas, help along the way, seems like it would work out the best for me. So I've decided to take the plunge!!!
A sales associate at RGT inspired me with a great idea. She is currently creating a garage to go along with her house...well, that inspired me to create something for the Woodstock...
I don't want to do a garage, (not yet, and not out of this kit), but one of these puzzle kits would be the perfect size for a shed!!! So I think that I've decided to create a shed for the Woodstock out of my kit... Check out my design inspiration...
I have a large amount of ideas for this, what I want to do, and how I want it to look, I'm only hoping I can pull it off with only one Build-Along kit!!! :)
*Please note on the Build-Along kit, that doors and windows are not included, it is just a box of blocks... :)*
Monday, February 13, 2012
OH MY CARPAL TUNNEL!!!
WOW...My wrists are KILLING ME!!! I spent the other night with them elevated and on ice-packs because they are soo sore from all the sanding that I've been doing!!!
The good news is the two side walls are done, the small spacer wall is done, and half of the front wall is done, (the bottom half!)...the bad news, I still have the bay front, and sides, and then the four triangles... WOAH, that list seems very long!!!
I am very excited though, in all the time that it's taken for me to get going on this house, make some decisions, and make some progress, I found out that I'm almost all done my Miss Lydia Pickett Kit of the Month Club with In Some Small Way... I just got my ladies desk delivered and next will be the bathroom, followed shortly by the kitchen...hopefully by the time I finish with the house, I will be able to assembly-line all the furniture!!!
If you want to check out the website of who I am working with on my Kit of the Month Club, you can go here... (this provides another link over to her webstore), as I am located in the states, and she is not, shipping can take it's time, but the customer service and personal attention makes the wait quite worth it!!! :)
http://www.insomesmallway.com/
The good news is the two side walls are done, the small spacer wall is done, and half of the front wall is done, (the bottom half!)...the bad news, I still have the bay front, and sides, and then the four triangles... WOAH, that list seems very long!!!
I am very excited though, in all the time that it's taken for me to get going on this house, make some decisions, and make some progress, I found out that I'm almost all done my Miss Lydia Pickett Kit of the Month Club with In Some Small Way... I just got my ladies desk delivered and next will be the bathroom, followed shortly by the kitchen...hopefully by the time I finish with the house, I will be able to assembly-line all the furniture!!!
If you want to check out the website of who I am working with on my Kit of the Month Club, you can go here... (this provides another link over to her webstore), as I am located in the states, and she is not, shipping can take it's time, but the customer service and personal attention makes the wait quite worth it!!! :)
http://www.insomesmallway.com/
Tuesday, February 7, 2012
Exterior Color Pt. II
So I mentioned last week that I was working on an exterior color change... well, I'm still working!!! :P
I have spent about a long time sanding and sanding...Just to show you how long this is actually taking...
I worked on this single wall all day today, literally, and this is how far I've gotten...(remember, to get the true-est color yellow, I want to get as much of the green and blue off as possible...)

I ended up at Home Depot yesterday and picked up the paint color. I told you previously that I was going with the same yellow as what was shown on the RGT 1/2scale Bungalow on their website, (a very light yellow)...when I requested the paint color from them, they sent me the combination...unfortunately the people at Home Depot were not willing to mix the paint in that way...so I ended up choosing my own yellow...
I chose this size sample...this is quite large enough to cover the house, it's only $3.00 and they mix the color you want...
 I opted for Cornsilk by Behr... I don't particularly like the online sample because I don't think it's very true to color...the actual sample I have and the paint that was mixed are much different than this internet rendition, so I'm not going to post it here...you will have to wait until the walls are painted!!! :)
The coordinating colors are going to be Poppy Seed, White, and Grayling, (all by Behr)...
I have spent about a long time sanding and sanding...Just to show you how long this is actually taking...
I worked on this single wall all day today, literally, and this is how far I've gotten...(remember, to get the true-est color yellow, I want to get as much of the green and blue off as possible...)

I ended up at Home Depot yesterday and picked up the paint color. I told you previously that I was going with the same yellow as what was shown on the RGT 1/2scale Bungalow on their website, (a very light yellow)...when I requested the paint color from them, they sent me the combination...unfortunately the people at Home Depot were not willing to mix the paint in that way...so I ended up choosing my own yellow...
I chose this size sample...this is quite large enough to cover the house, it's only $3.00 and they mix the color you want...

The coordinating colors are going to be Poppy Seed, White, and Grayling, (all by Behr)...
Wednesday, February 1, 2012
Lights, Camera...FRONT DOOR!!!
I told you in a few previous posts that I had been debating on a front door, and then (with all of your help) I decided on combining two different doors to get the look that I want.
 While ordering the parts to create this door I also included another door that will be for the kitchen leading to the other side of the house. I plan for this side to have a little potting area for the owner, as she likes to plant various flowers and herbs and spices... :)
This is the door that I have on tap for this, I'm a little worried because it seems fancier than the front door, but I'm hoping it will look alright...
 I plan to have this door sit to the far back of the kitchen wall so as not to jeopardize valuable kitchen wall space. I will need to cut this door opening before I begin construction, but that shouldn't be to tough... :)
I had created this door previously for my 1/2scale (still not completed) Fairfield.
This is the door that I have on tap for this, I'm a little worried because it seems fancier than the front door, but I'm hoping it will look alright...
Subscribe to:
Posts (Atom)