Friday, April 13, 2012

The Conservatory... (Part I)

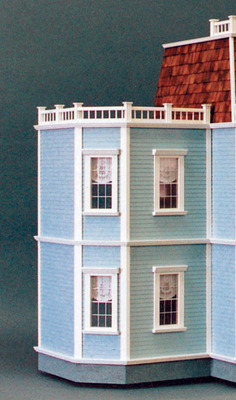
I had opened up the box of parts for the Foxhall Conservatory and was a little disappointed when I really looked at them.  Unfortunately my big plan of making a conservatory on the side of the house off the kitchen, (to make into a dining room), is just not going to work. 

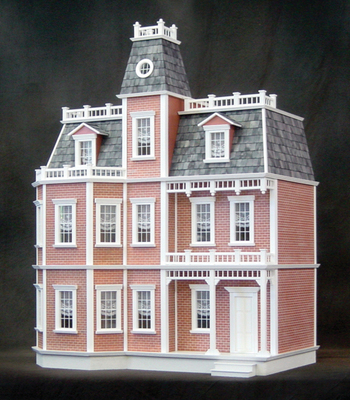
The walls of the conservatory are on the left and the Newport side wall is on the right...

The difference in the wall heights are way too much for me to figure out how to work with, so back into the box the conservatory went.  I've decided to come up with a new plan.

Last year my DH had me order a garage door kit for my *surprise* Woodstock, thinking I would turn the Mansard addition into a garage/man cave for the house. 


Ultimately I wouldn't have done that because my floor plan called for a different room using that addition kit, so the garage door went into the "To-Be-Sold" pile.  While it didn't work out with the Woodstock, it might work out with the Newport.  

I've done some poking around online at different bricked houses while in the planing stage, trying to get a feel for the contrast colors I want to use and any inspiration I could come upon.  I kept going back to the Home Alone movie house as my inspiration.  I know that there was a garage with this house, but it's not really featured too well. 

So I did some more digging online and found a great inspiration photo for my garage online...I like this all bricked one, thinking that it would be great to try to reproduce.   
While I intend to create a garage, I am not going to exactly replicate this one.  I have no intention of peaking my roof, (it will be flat) and I don't want a 2nd floor on it.  I do like the side door and pathway, the window, the transition in front of the garage door, the all white trim against the brick and the grayed shingles.  These are elements that I fully intend to incorporate into my design. 
So we are back to the drawing board, how to create this?

In the build of the house on the right side, (looking from the front), the walls are shorter than the left side walls.  I quickly found that if I took these two shorter walls, (first and second floor) and put them together, it would give me a side and front wall for a garage!

Shorter side walls used as front and side wall(and me propping my garage door!)
Front of garage

I am happy right now with the proportion of the door to the wall siz, however I need to complete the first floor dry-fit, (which I haven't gotten to just yet) to make sure I'm happy with the proportion size of the "garage" to the house...I also need to plan out a roof and floor...(which will probably be plywood from Home Depot.  I'm hoping that it will size up nicely and compliment the house well. 

What the interior will look like... (my DD likes it!)
However because these walls are rather critical to the actual build :P  I need to reorder them from the manufacturer.  Trying to mimic them or re-create them in any way is not going to work for me, as I'm too particular!!!

Wednesday, April 11, 2012

Help Is Just Around The Corner...

YEAH!!!  After less than a week my Newport arrived!


I placed the order on Monday and it's been showing in my queue as "Backordered", since it's shipping direct from the manufacturer and I assumed it would take a while for my order to process.  Friday I went out for the day and came home and there it was, sitting on my porch!!! 

I was soo excited, I barely waited an hour (and I don't know how I did that!) before I had the box torn open to see the brick up close and extremely personal.  I showed my DH and even he was impressed at the quality of work...


The pieces are just gorgeous, I'm very happy with all the components...the walls may be MDF on the inside, but that is all going to be covered up with wallpaper anyways...the floors are gorgeous plywood, meaning I can either stain them as is or cover them with something else, either way, the options are great!!! :)

Box of components...

I went through both sets of directions a few times and kept envisioning how I want this build to go and I have also frequented the http://www.dhbuilder.com/ website.

There is a great picture tutorial on this exact house build, (found here).  While it really helps to see pictures of the same exact build, (particularly from the manufacturer) I intend to build my house a little differently.   It helps to see pictures of another build of the same house, (particularly when they come direct from the manufacturer!).

Now the fun begins!!! :)

Tuesday, April 10, 2012

Windows and Doors and Pediments...Oh My! Part I

The best thing(I think) about the Real Good Toys kits are that the windows and (exterior) doors are included on almost every kit (shell kits excluded).  With these components included and the quality of the kits and the (often) reasonable pricing on them makes them a stand-out brand - at least in my book! 

However, sometimes the windows and doors are just not "up to par" we'll say.  For instance, on almost every single RGT house, I've planned to change out the front door.  While there really is nothing wrong with the door quality wise, it's just not the look that I want for my house, and this house will be no exception. 

Typical standard door
Deciding on a door will be easy, once I choose the style of the windows.  I've worked with the Batrie line of houses by RGT before, and that means assembling the windows from pieces supplied...meaning that they are very easily changed/altered if desired.  I knew that I wanted to dress the house up a little bit with the windows, but changing out the supplied windows to a full window is not an option within the budget.  The next best choice is to change out the pediments...here are my options...


Deerfield Pediment - Cute!!!  However a little too fancy!


Federal-Style Hooded Pediment - Um, NO! (You can include the Federal-Circle style too!)


Yorktown - looks like this is my option...


So if the Yorktown pediments on the windows are the way to go, then the Yorktown door is where I will be headed with the front door... I am going to order the Yorktown door, but I also own a Deerfield door, so I may go ahead with that, depending on how that door looks with the pediments I chose. 
Next are the dormer windows.  I do not know the dormer window measurements just yet, but looking at assembled house from the internet, I'm not a fan. 


They just seem so skimpy to me, I plan to beef them up a little, altering them to fit these dormer windows, (which will match the pediments I chose).  

I want to create a small seat on the opposite side of the window, but knowing that this is the third floor, there is plenty of time to get to it (and that basic round tower window!!!) :)

I earned some nice Bonus Dollars with my kit order, but I am waiting for the next sale to get these items...  hopefully the house will arrive before they do!!! :)  To my loyal followers who read my posts more than I think you do, thank you and for your dedication, I promise you soon, that my pictures and work are coming!!! :)

Friday, April 6, 2012

Grace and Enthusiasm... and Making Room...

Grace and enthusiasm are how I'm starting out this post today.  Thank you to my loyal fans who sent such wonderful words that inspired me to take the preverbial "high road" and address any issues with how I was feeling about blogging, first hand and right from the start.  And grace and enthusiasm are what I was met with and for that not only is my mind at ease, but the reception with which my "letter" was met, was very much appreciated... ;)

I'm going to go back to my very first Newport kit for a minute here, and then elaborate on my "new" Newport kit, (still yet to arrive).

My very first dollhouse kit (that I purchased to make) was a RGT Newport, I even had a blog about it!  I got it in October-ish of 2009 after I was let go from my full-time job and became a mommy to my DD.  She was only about 5ish months old and I had talked DH into letting me do this now so she could have it later on down the road.  Not knowing too much on how to actually obtain a dollhouse kit, I opted for the 50% off coupon from ACMoore, (because they sold them right there in the store!), grabbed the biggest one they sold and off I went...

I made sooo many mistakes... I over-prepared for it, over-bought for it and over-did it!!!  I had soo many ideas, but really no focus or knowledge on how to do anything.  I painted everything, before even inventoried or labeled it!!!  I ended up painting parts of the connectors that would later have to slide together, which by the way, in case you didn't know, painted wood doesn't slide.  Dry-fit?  I didn't know what that word so I didn't do it.  I had no clue really...

I got the foundation assembled (oh my what a disaster) and my DH helped me brick it, then sold it on Ebay...there were many reasons why, but regardless of what they are now, it's gone, however, it did go to a great home...(the lady that bought it had built a dollhouse for each of her three daughters and this was for her). 

For that house, one of my grand plans was to add more room... I ended up getting two of the two-story side addition kits... (one for each side of course!)
I am (of course) going to add one to the side of the house, though I'm still in debate on which side of the house to add it to.  I am unsure whether or not I want to expand the kitchen and make a separate dining room, (adding it to the left side) or make a family rec room/office (adding it to the right side).  Part of me is leaning to adding it to the right because I don't want my family to have to walk through the master bedroom on the second floor in order to get to it...looks like I have some more planning to do... :)

Wednesday, April 4, 2012

I can see you now, shaking your heads at me...

Yesterday was the annual "April Fool's Day Sale" at HBS/www.miniatures.com... this meant that they gave out a great discount of 40% off any one item in the store. 

I had been waiting in anticipated breath for this sale...then I found out that the item I wanted, (my milled plywood walls for my Woodstock), is considered a special order item and could not be included in the sale... (CAN YOU SEE THE TEARS?)...

I debated all day on what I wanted to do, order nothing, order a half scale house, or wait and get the Woodstock at another time.  I ultimately decided on none of the above. 

Say hello to my kit... 

I ended up ordering a Real Good Toys Newport kit with the pre-brick finish.  I had started off with a Newport as my(technical) first house, (if you don't count the one I did when I was a child) it was also MDF...ironic huh?

I thought I would go back to what I know, there are so many reasons for choosing this house, I love the fact that it's pre-finished on the exterior, even if the inside is MDF, (that's getting covered in wallpaper anyway), so there is no sanding of clapboards and painting and priming and painting, and sanding of clapboards!!!  I also love, love that it's a "layer-build", (meaning that it's built like a layer cake, the first floor is built, then the second and so forth), I'm looking forward to working with a house like that because that's the same way that my 1/2scale Bungalow was, (and it was a breeze to wallpaper!!!)...

I do have some ideas for change, first will be to replace the small circular window on the third-floor tower, expand the front porch to put my rocking chairs, (or my Raine Take A Seat chair).  I also want to put up an addition on the side of the house to add some more floor space...after doing the layout for this house I realized I need some more space.  However, like the plan with the Woodstock, I intend to just abut the addition to the side of the house, without permanently attaching it to the house, making it easier to move and manuever. 

There are a lot of ideas I have swimming in my head, many changes I want to make, some minor, some major.  I hope to build this house and keep it, I still have the dream of my Woodstock one day(it's not going anywhere just yet), but I'm looking very much forward to this new adventure and I hope you are too... :)

Monday, April 2, 2012

Where are the great finds coming from? I'll tell you... :)

So I thought I would spill the beans on my dining room finds...

I've been showing you in previous posts, here, here and here, that I've found the most gorgeous dining room, and I thought I should elaborate on where they came from. 

Small World Miniatures, and Ebay store, (a favorite of mine) is where I'm finding these pieces.  I had been stalking the store for a while, (new furniture auctions are typically uploaded on a weekly basis), when I came upon the dining room chairs by accident and completely fell in love!!!  Coincidentally within the same set of auctions there was a table that I thought/hoped would match...turns out it matched very well!!!  A week or so later I found the additional chairs and hutch and then most recently the sideboard and more chairs.

I'm not a huge Ebay fan, I do utilize it if I choose to sell items, and I do like to scour to see if I can come up with a good sale item from time to time...there are a lot of dis-honest sellers and there is a lot of over-priced junk out there too, but this particular seller is great, I have never had an issue with them and they always ship super fast and most importantly great customer service!!! :)

P.S. Guess what arrived on Friday...MY MANSARD ADDITION WALLS!!! :)

Wednesday, March 28, 2012

Another sign of "something to come"??? ;)

So I told you in a previous post that I found a great dining room set for my Woodstock...

Well, I found a few more pieces!!! :)

A sideboard that matches the set!!! 

And...

Two (more) Side Chairs!!! :)
P.S. I just ordered the two new walls for my Mansard Addition...so I'm very excited!!! :)