Tuesday, May 22, 2012

Yeah, I'm Crazy!!!

I really cannot explain why I do the things I do...

I won an Ebay auction for a Glencroft Dollhouse Kit...
I have to admit first off, I am so jealouse of Glencroft builders.  I had a brief hand in helping with the beginning of a Glencroft already and I loved it so much!  I am not sure why, but to me, it is so unlike most other Greenleaf builds.  I find that the design, while easily customize-able, is also wonderful as a basic build. 

I do, already, have many very specific ideas for how I want this to look.  I am so excited about it, I can hardly wait to work on it, meaning I will probably have the Newport going at the same time as this build.  ~ (insert crazy part here) ~

I like the original idea that a member on the Greenleaf Forum had when she bashed out the side window on the staircase to create a little alcove...it's so nice and I plan to replicate it in some form.  I also love the idea of the window seats that she did and plan to incorporate something like that as well...

I have the idea that it's going to be like a country in the woods cabin style...I don't intend to go towards the "tudor-ish" of it all, but rather playing with the beams and incorporating more stained wood that I would normally.  I'm not sure how "modern" I want to go, or stick with more of a time-piece. 

I love the updated take on this house, the windows are gorgeous!
They remind me of my Woodstock ones...
I love the stone work around the doorway also...

I have a thing for the darker tan and red brick combination shown here...
This is what the tudor houses near me look like...

I would also like to play around with creating my own fireplace, (like many other miniature-ists have done).  There are walls on the first floor and second floor that are both all fireplace.  I have some ideas along the idea of these styles to incorporate into the design...

I like the more updated feel to this room,
while still being cozy and warm...

I could create an open concept kitchen/living room (like this one)
 by bashing out the interior wall...

Or stick to the older feel of the house,
altering the side window off the kitchen to create two windows
I have thought about this house for almost two years now...so I have many ideas to choose from...these are just some of my favorite ones... what do you think?

*All images are from past Google searches, I never saved any links to them...
if they are yours please let me know and I will remove.* 

Monday, May 21, 2012

A Little Stagnant ~

Stagnant - Having no current or flow and often having an unpleasant smell as consequence...

Well, O.K. then!  The unpleasant smell part may not apply, but I have no current or flow right now, so it works... ;)  I'm stuck on a couple of things and that's why you haven't seen a post (or two) lately...

It looks like you all really liked the bay window improvement, that is great!  I thought you would... ;)  I do!  I did decide though that instead of adding the bay window to the study, I'm going to put in the door... 

I really thought about it and I may add the bay window to the second floor of the addition instead.  I am going to eliminate the deck off this door, but I am going to make a little staircase, and put in some gardening, etc.  I liked the thought of having the door here much more than I did the window. 
 
I will add the double window to the bay area of the front of the house, both on the first and second floor... I really like the idea of this window here, and on the second floor...the single window here does nothing for me.
 
 
It also looks like you voted to extend the porch, another great! 
I like the idea of the porch rockers rather than the wicker set, so this will stay, with a little table to complete the look.  So the next thing for me to do is get the porch floor and foundation in place permanently so I can finish the foundation. 

As soon as my DH cuts the door openings for me on the addition kit I will be putting up the walls and gluing them in place...very excited!!! :) 

So I know what I have to do, it's just doing it, (well, finding the time to do it!). 

Tuesday, May 15, 2012

Improved Bay Window? ~

I was playing around the middle of last week and found some spare parts...I had three bay window kits from the RGT Bostonian I had (once upon a time) planned to renovate...

I put one together and I think I like the way it looks.  It's the same style window as the Newport windows, so it almost looks like it should be standard with the kit!

Bay window next to the standard Newport window
(the Newport window has a sill that is not shown)

The next thing I did was check to see how it would look if I put it on the study wall...
Here's the same wall with the door...
I am undecided on which I like better.  I am leaning towards not adding the deck idea because that would make the house really WIDE!  I can still use the door, but I would probably just put a staircase going down to the oustide and still leave the deck off...

I like the bay soo much that I thought about trying it in another spot. 
I surprisingly have just enough parts to make a third bay window
and I could add to the second floor in the same spot.

Here it is inside the house...
What do you think?

Monday, May 14, 2012

Front Porch (part I) ~

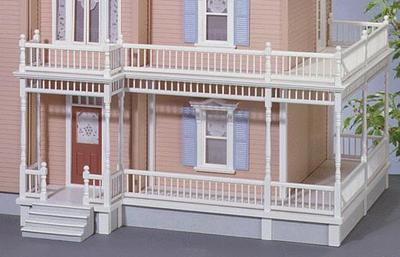
A big pet peeve of mine is the porches that are given to dollhouse kits.  I mean, they sell gorgeous outdoor furniture, why can't we have a nice full porch to display it on?  Instead they give us this tiny little ledge and then everything looks squished! 

The Woodstock came with this type of porch/front stoop set up...

I had huge plans of bashing up this porch to no end!  The upper porch would have been cut to the end corner, and the material would have been used to extend the first floor porch wider...It's sad really, the more I play with the Newport, the more I miss my original ideas of the Woodstock!

Moving on...

I am playing around with extending the front porch on the Newport.  I think I will let my blog followers help me decide on what I should do...
First option...
This is my Raine Take A Seat set...
You can see the extended porch foundation in place in this picture.  I like the smaller porch, however it eliminates the use of railings, which I could take or leave really!  I don't intend for this to be the place for this chair and ottoman...but it shows I have options...
Option Two... 
Extended porch w/two rockers
You can see here my porch extension piece, (cut from leftovers from another project).  This gives the opportunity to add the two chairs and have some space, (if I go with this I will add a little table too).  This also lets me add railings around.
Just another view of Option One... 
Same rockers without the extension...makes it tight, but still workable, again I wouldn't have railings...maybe just the side of the door? 

What do you think it should look like?

Friday, May 11, 2012

Foundation Time! ~

I am done playing for now...I guess.  It is great fun for me to bring out all my furniture and see how it will look, it starts to make it the experience seem real.  I am so close to having the first floor up and ready to go that it won't be long now!

In order to get the first floor walls up I need to finish the foundation. 

I started work on the addition foundation first.  Remembering that the addition will be built separately from the rest of the house, the foundation needs to be consistent all the way around.  I played around with the idea of some sort of bricking, but then came up with stucco.  You can either buy stucco grit mix, use sand, purchase pre-made dollhouse stucco or plain old spackle will do also. 

I had on hand some Mortar Mix and the more I thought about it, the more I wanted to use it as is.  I had primed and sanded the pieces before assembly so all I did was to put up a coat of dark tan all around, making it consistent and not wanting any white to peek through.  I then painted on the mortar mix with a stiff bristle brush.

I did only two sides of the addition foundation and then let it dry to see how it looks...I'm quite happy with the outcome. 
I think it looks just like concrete, (a typical foundation where I live)...and won't distract too much from the rest of the house.  I coated everything once with a coat of Polycrylic, (a water-based polyurethane), so it wouldn't turn yellowish over time.  I'm going to add a second coat so it will get a nice strong seal to it...and once that's finished I can put the final coat of paint onto the nosing and attach...then up go the walls!!! :)

Thursday, May 10, 2012

The Newport Kitchen (part I) (do-over post) ~

Well, really, did you think I would give you a new living room post and not a new kitchen post?

The whole reason behind the dry-fit in the first place was to decide on the kitchen.  I told you previously that I had a design in mind for the kitchen.  I put the house together (with tape) and put the furniture in I had as place-holders, executing my idea...

Here is what it looks like...
The door to the right rear is going outside...the door to the left rear is going to be filled in to create more wall space.  I imagine that the sink will go here if I stay with this layout.  The rounded island, (next to the stove) will have a blind corner cabinet that would look flush once finished.

Bit of a background and off pace here...

I had purchased this kitchen set, with the other two matching pieces, (shown above)...I detested the countertops, so I sprayed them with textured spray paint to change the countertop color.  The sink is not pictured because, (if I use this set) I need to order another one... Long story short, I tried pulling the sink out, it didn't work out well!


So just for comparison I put up the Bespaq set...


I am in LOVE

What do you think? 

Wednesday, May 9, 2012

The Newport Living Room (part I) (do-over post) ~

No, you are not seeing double, I made you another living room post...I did a dry-fit after I published that post, and thought you might want to see some real photos and my direction...

Here is the whole living room, with the kitchen divider in place. 

I wanted to break the room down by sections so you can get a visual for the direction I want to go. 

First is the front door and staircase...
I am playing with some ideas on what to do here.  I need a doorway into the addition kit, and while I like the reversed staircase, (facing the front door), I'm not settled on that being it's final position.  If it is, it will probably have a small closet or a built-in with a bookcase design that I have been playing with.  The staircase itself is the Houseworks slim staircase.  It was a place-holder at first, (I am up-grading the MDF staircases that are standard with the kit) but surprisingly it's now really growing on me and working with the fit of the room.

Next is the kitchen wall...  

The divider in place works here for my kitchen layout, however the doorway on the back of the house will be filled in and flush.  The furniture seen here is not just place-holders, they will all remain, and pretty much exactly where they are. 
Next is the half bath...
The idea for the half bath is not my original, Brae/Otterine came up with the idea for using this corner space as a half bath.  It makes a lot of sense because, typically you wouldn't have the main bath on the second floor of the house be the only bathroom in the whole house. 

A bathroom should be constructed either here or under the staircase.  Here is best, it takes up this really non-use-able space.  The furniture is definitely place-holders!  I have something much more modern planned for this space, a realistic toilet and something along the lines of this for the sink...

I'm still up in the air about a lot of decisions, nothing is final...but it will give you a peek into my thought process...